
Insider Knowledge Of The Camera Sensor
My purpose here is to provide insider knowledge of the camera sensor. This will help you understand how it can affect the results of your photography. I will delve into how the sensor is made, but only to the extent that the construction can affect your final image.
You will see that the larger the sensor, the higher the potential for a quality image. I will point out other factors that can affect image quality. Also, I will show that you have to consider more than just the sensor when choosing a camera system.
If you want more technical information on image sensors you can look at Wikipedia, or go more in-depth at Teledyne Photometrics.
Recording light
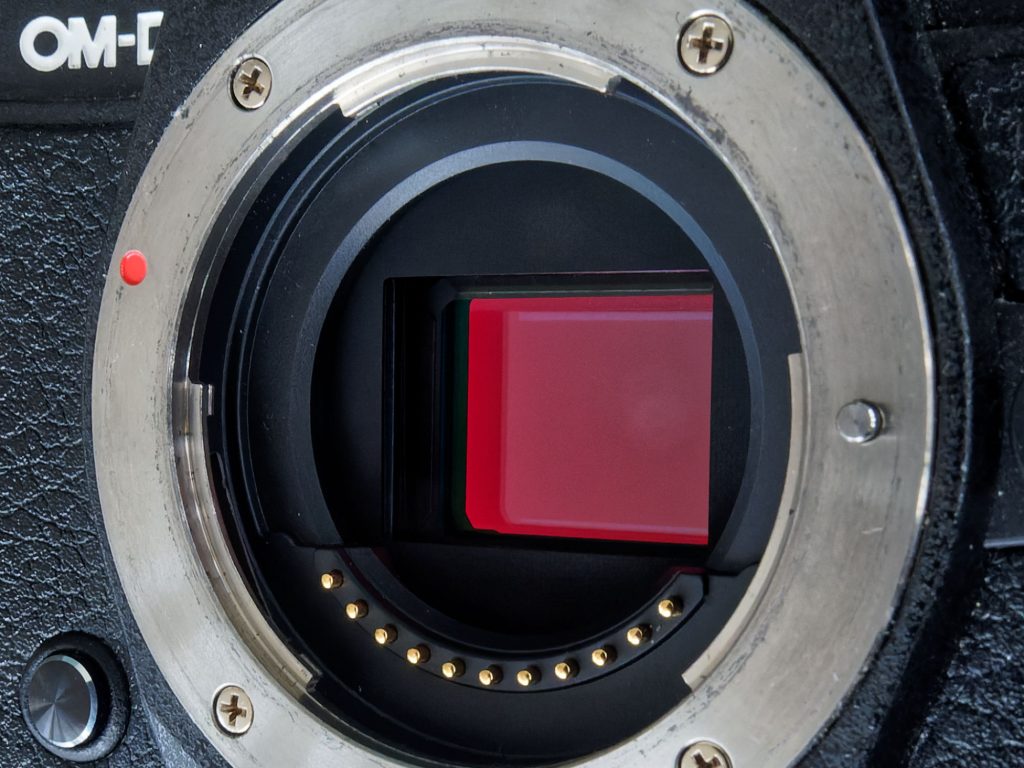
To create a photograph, we have to record light transmitted from the subject we want to photograph. The sensor is the part of the camera that sees and reacts to that light. It works in a similar way to the retina in our eye, collecting the light and sending signals to the camera’s brain. The brain of the camera is the processor, which uses the signals from the sensor to build the image.
A camera sensor is made of a large number of photosites. Each photosite is a single electronic component that responds to the light falling on it. The photosite produces an electronic signal based on the colour and intensity of that light.
Photosites are usually square, and each one can only send one signal to the processor. The whole of that square will be recorded as one colour and one tone. However, they are very small and a sensor is made up of millions of them.
When we view a digital image we don’t usually see a lot of tiny coloured squares. Rather we see a compilation of all the squares together that create the image. However, if we zoom in on a small part of that image the squares become visible (FIG 1).
We refer to these squares as pixels. Rather than read about the number of photosites a sensor has, you will find a reference to the number of pixels that the sensor can produce.
The camera sensor specification
Camera specifications usually state the maximum number of pixels that make up an image made with its sensor. For example, you may see something like 12mp, 20mp or 45mp. The ‘mp’ stands for ‘million pixels’, so each of the above examples can be understood as follows:
- 12mp = 12 million pixels.
- 20mp = 20 million pixels.
- 45mp = 45 million pixels.
These are examples and cameras are being developed all the time so you will see variations of the above numbers.
Recording detail
In theory, a higher number of pixels will produce a higher level of detail in the image. To understand this concept, imagine that a camera sensor is made with just one large photosite.
Recall that a photosite can only send one signal to the camera processor. The photosite has to average out the colour and light intensity that falls on it. With just one photosite we get an image that appears as a solid block (Fig 2). The colour will be dependent on the colour of the light falling on it. The tone of the block will depend on the intensity of the light falling on it.


Now suppose our sensor is made with six photosites, three across the top and three across the bottom. If we take a picture of a landscape, the chances are that the three pixels across the top will be lighter and bluer than the three across the bottom (Fig 3). This assumes we are looking at a typical landscape with a bright blue sky across the top and darker greener land across the bottom. Clouds in the sky may change the colour of one or more of the top pixels. Similarly, a clump of dark trees will influence the colour and luminosity of at least one of the bottom pixels.
We now see the sensor starting to record detail. As we add more photosites each one records only the light falling upon it. We start to get variation in the colours and tones recorded by the individual photosites, and so we build up the detail of the image.
Zooming in on the detail
Nature is not constructed of square pixels. Rather it consists of continuously varying colours and tones. That said, where an object stops there is a sharp division between that object and the one next to, behind, or in front of it.
If you take a picture of an object that sits in front of a white wall you will expect a clearly defined edge around the object. Light will be reflected off the object and the wall, go through the camera lens and fall on the camera sensor. You will expect the sensor to record both the white wall and the object colour, showing that clearly defined edge between the two of them (FIG 4).
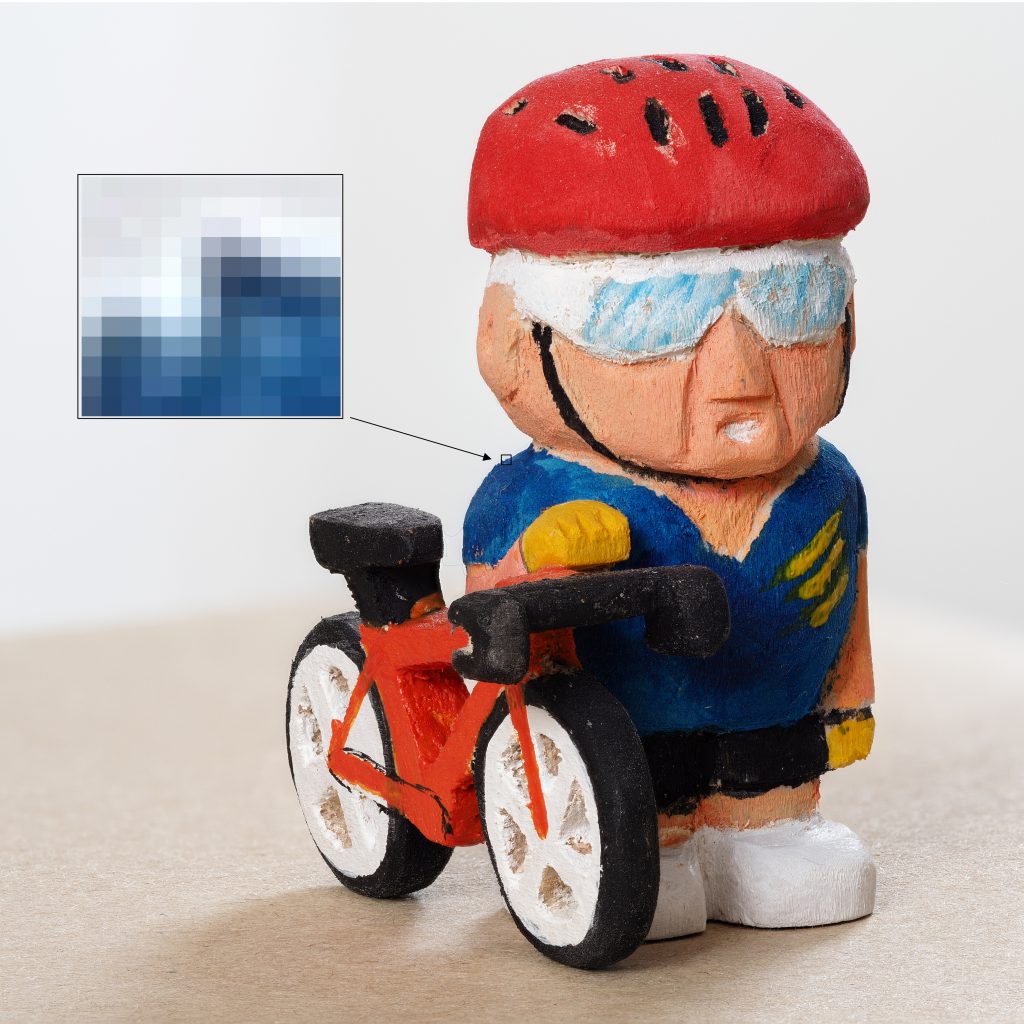
But, what will happen if a single photosite receives reflected light from both the wall and the object? That photosite will have to average out the colour and intensity of light from both. It will be neither white nor the object colour, but rather a mid-colour/tone of both. If you look at the zoomed-in section of the image above this is exactly what happened, even with a 40mp resolution.
Replacing one photosite with four smaller photosites increases the chance of the light from the wall falling on two and the light from the object falling on the other two. We will then have two white pixels and two coloured pixels, instead of one larger mid-toned pixel. The result will be a clearly defined edge to the object in our image. We refer to this as a higher level of resolution, it gives us more detail and a sharper image.
The more pixels the better
You should now begin to see that the more pixels we have the sharper and clearer the detail can be in the final image. This is true, to an extent.
Unfortunately, smaller photosites receive less light. This presents a problem as small photosites do not cope so well in low light. They can struggle with the dynamic range of light. So highlights tend to be blown out (pure white) and the shadows tend to be blocked in (pure black).
Dynamic Range
In photography Dynamic Range refers to the difference between the lightest light and the darkest dark. In full sun we usually end up with a wide dynamic range (a lot of contrast) whilst in overcast weather the dynamic range is narrow (very little contrast).
Camera manufacturers have to make a compromise between the size and number of photosites used in their sensors. They would no doubt love to use trillions of photosites and offer incredible detail and sharpness. But they know that by increasing the photosite size they can overcome the potential inaccuracies of smaller photosites.
The camera sensor size
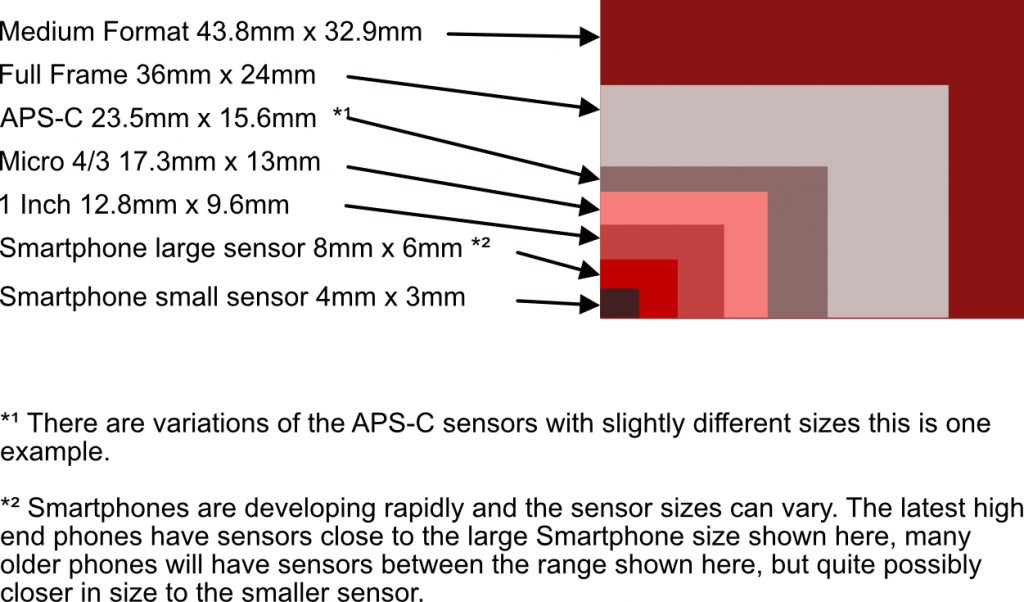
Not all sensors are the same size. You may have heard of Full Frame, APS and Micro 4/3s among several others. The term ‘Full Frame’ comes from the original 35mm Film Camera before the days of digital. The film used in a typical 35mm camera would produce an image size of 36mm x 24mm.
A Full Frame digital camera will also produce an image of 36mm x 24mm the same as 35mm film. This is regarded as a standard by which everything else is measured. A Micro 4/3 camera has a smaller sensor and will produce an image of 24mm x 18mm, half the size of a Full Frame sensor.
Sensors and lens Size
Because a Micro 4/3 image is half the size of the Full Frame the lens required to produce the same angle of view is half the size. A 25mm Micro 4/3 lens will give the same angle of view as a 50mm Full Frame lens. You will often see reviews of a Micro 4/3 lens stating its equivalent Full Frame size.
The same can be said of other camera systems. The APS system is roughly 1.5 times smaller than a Full Frame. So a 35mm APS lens will give an angle of view similar to a 50mm Full Frame lens.
The important point to note here is that the sensor size will vary according to the camera system you choose. As a general rule, you can expect larger sensors to have more photosites, produce more pixels, more detail, provide more accuracy in low light and better handling of a wide dynamic range.
On that basis, we should all spend megabucks on a medium format camera with a large sensor and grow extra muscles to hump it around with us all the time.
Interestingly though the most common camera used is the mobile phone camera. Yes, that’s the one with the smallest sensor. Generally, the phone goes everywhere with us and produces results that the majority of people are happy with. As the saying goes ‘the best camera is the one you have with you.’ Get obsessed with picture taking not equipment.
Big or small camera sensor?
To produce the highest quality work, perhaps to sell the pictures to a discerning customer, you may want to consider investing in a medium format system. But if you want to be able to move about and respond quickly to changing circumstances a Full Frame system will probably suit you better.
There again if you intend to travel or go hiking with your camera gear, the lightweight Micro 4/3 system will still provide great quality images. And of course, for those unplanned spontaneous moments, we can always rely on the mobile phone to provide at least an acceptable image.
You also need to consider file size. High-quality images produced with lots of pixels, will take up a lot of digital storage space. You will need to consider what you will do with your images once you have taken them.
Do you have a computer with enough storage space? Will your computer be powerful enough to process the images with your chosen software? Will you have enough RAM in your computer to cope with the processing of a large image? If you choose to use a mobile phone as your camera you can of course use an app on the phone for post-processing.
Constantly advancing technology
I remember when digital cameras were only just coming onto the market. At that time it was said that digital cameras would never provide the quality achievable with film, but that has been shown to be a false assumption.
With electronics constantly advancing we should not be surprised to find, that in just a few years, the quality of images taken with a mobile phone outstrips the quality of today’s medium format. Of course, that will also mean that all the other sensor sizes will improve as well. But by then the quality of images being produced will probably have reached the point at which our eyes are unable to discern the difference.
Your choice of camera system must be based on your requirements now; quality, convenience, weight, cost. To increase the quality you will probably need to increase the weight of the system and the cost. You should also bear in mind that when manufacturers improve their sensor and camera processor you will only benefit if you purchase the new camera model with the new features. As a rule, the lenses and other accessories within that system will continue to fit and work correctly.
Image quality – more than just a big camera sensor
As well as the sensor, other factors will affect the final result of your image. You can spend a fortune on the best camera system with the best sensor money can buy, only to find that your images are blurred, lack contrast or have poor colour reproduction. The main factors you have to consider are:
The lens
A poor quality lens may not focus the light correctly onto each photosite. Whilst a photosite will accurately record the light that falls on it, the light focused by the lens may not be a true representation of the light reflected from the subject you are photographing.
The aperture
Smaller apertures cause diffraction, that is the light has to bend to fill the edges of the frame. This can affect the focus of the light on some of the photosites, resulting in fuzziness in the image, especially around the edges. Larger apertures can also cause issues with edge sharpness.
Camera movement during exposure
A movement of the camera, or subject, whilst the exposure is taking place, will cause light falling on one photosite to shift to another, this can result in a fuzzy image. The shutter speed will play a role in determining whether any subject movement will affect the image. Keeping the camera still during the exposure is essential. But large cameras and large lenses are harder to hold still and may need a tripod to support them to avoid camera shake.
Shooting into the light source
Extreme brightness from the lighting source can cause flare. Lower quality lenses tend to have more issues with flare, but any lens can be affected. The result is that the light from the flare replaces, or amalgamates with, the light being reflected from the subject and reduces detail. It can of course be used to good effect in some circumstances.
The ISO
Changing the ISO, in theory, changes the sensitivity of the sensor. But increasing the ISO places more demands upon the photosites, which struggle to record the light falling on them accurately. The result is what we call ‘noise’, which can show up on the image as coloured specs, and reduces the detail available in the image. As a rule, the smaller the sensor the more this becomes a problem.
The shooting and Post Processing format
System cameras usually offer the option to shoot in the RAW format. This is a means of recording what the camera sees without making any adjustments to the image. You will need to process the image on a computer, or another device, to produce a usable image. You then export the image in a different format, the most common being JPG. Alternatively, you can choose to shoot in JPG. In practice shooting in JPG simply means that the camera software will process the image. The contrast and saturation of the image may be increased, as determined by the camera manufacturer.
JPG Format
A JPG file is a compressed file, which means the software reduces the amount of information in the file to reduce file size. The compression is done intelligently and on the whole only unnecessary data is removed from the file, but data will be removed. Shooting in JPG you may lose information, especially in the extreme highlights and/or shadows. By shooting in RAW you may be able to retain that information by processing the image yourself.